Think "laser," and what comes to mind? Whether etching onto metal, wood, or acrylic, the result is often limited to stark black or white markings. What if you could add a vibrant splash of color to transform those creations?
This blog dives deep into the fascinating world of color laser engraving. We'll demystify the process behind achieving stunning, permanent color effects with a laser and showcase the impressive results you can achieve. See how color laser engraving can elevate your projects from functional to truly spectacular.
l. What is Color Laser Engraving?
Before formally introducing the steps of color engraving, we first need to understand what color engraving is. Color laser engraving is a technique that adds different colors to an engraved surface. It works using different methods and principles depending on the material. But there are two basic principles. Either naturally achieve color engraving with the help of oxidation, or you need colorants to obtain the desired color.
However, it's crucial to understand: not all lasers are created equal for this task, and not every material readily accepts color. Not every laser engraving machine is a color laser engraver, and not all materials are suited for laser engraving with color. We'll clarify exactly what you need – the right color laser engraving machine and compatible materials – to make color laser engraving on metal and other surfaces a brilliant success.
ll. Materials Suitable for Color Laser Engraving
Two typical materials for color laser engraving are metal (stainless steel and titanium) and hard plastic (less common). By adjusting the laser's pulse width, frequency, power, and speed, metal can be colored in multiple ways.
2.1 How to Achieve Color Engraving on Metal
For metal, the heat from a high-power fiber laser may cause an oxidation reaction, producing a colored oxide layer. This layer reflects light in different ways to create a color spectrum. The thickness of this oxide layer determines which wavelengths of light are reflected back to our eyes, resulting in different perceived colors.
Color laser engraving on metal is primarily achieved through two methods:
Oxidation Method: The laser melts the metal surface. The melted material solidifies again, but due to oxidation, a specially colored layer forms on the metal, appearing as color engraving. Thus, you see vivid colors on the engraved surface instead of the normal engraving color. The obtained color depends on the laser settings and the type of metal used.
Grating Method: This involves coating the metal surface with a colored oxide layer. When the laser beam falls on the metal, it begins to melt, and the applied oxide layer also dissolves. After engraving, colored marks appear. This method is very useful for metals that do not naturally provide color after using a laser engraver.
2.2 Color Laser Engraving on Other Materials
√Plastic: Typically avoided due to toxic gas/odor emission when melted. Plastic does not naturally develop color from laser processing. Two solutions: engrave on pre-colored plastics (e.g., acrylic), or manually add colorants that fuse with melted plastic during engraving.
√Stone: Resists heat deformation but offers limited colors (mainly yellows), unlike metal. Pre-engraving material testing helps optimize color parameters.
×Wood: Fiber laser markers (1064nm) struggle with color on wood. Low near-infrared absorption causes heat diffusion, producing faint monochrome charring (light yellow to dark brown). These devices target metal/plastic, lack multi-wavelength support, and cannot combine spectral energy for color.
III. Laser Color Engraving Procedure
3.1 Material Preparation
Software Preparation: LightBurn LightBurn software accommodates users from beginners to professional engravers, allowing manual switching between Beginner, Advanced, and Professional modes. Purchasing EM-Smart laser engraver machines includes free LightBurn licenses and usage rights.
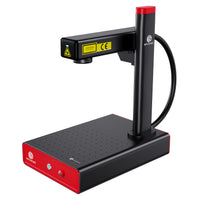
Hardware Preparation: EM-Smart Mopa 30W, Cutting Panel The EM-Smart Mopa distinguishes itself from other EM-Smart models by enabling laser color marking—a feature detailed later in parameter adjustments.
Material Preparation: 10cm×8cm Stainless Steel Plate (as an example)
To prevent laser damage to the color laser engraving machine’s work area, place a cutting panel or other laser-inert material horizontally before engraving.
Select "Port Settings" → Choose "JPT" or "IPG-YLPM" laser type.
Features
RAYCUS
JPT
IPG-YLP
IPG-YLPM
Keys
Cost-effective, Stable and durable
Adjustable pluse width, color laser engraving
Faster and deeper laser engraving
Superior MOPA, flexible pluse width
Color laser engraving
×
√√√
×
√√√
Precise engraving
√
√√
√
√√√
Deep engraving
√√
√√
√√√
√√√
Lifespan
70,000 - 80,000 h
70,000 h
100,000 h
100,000 h
Price
$2,000 - $2,800
$2,800 - $3,500
$4,000 - $5,000
$4,500 - $6,000
Usage
Common metal laser engraving
Color laser engraving on metal
Fast and deep engraving
Precise and color laser engraving
Material Test Engraving (if limited material):
Engrave a minimized graphic (e.g., 5mm×5mm) to observe color.
Adjust parameters interactively: speed, pulse width, frequency, and power
Higher frequency disperses power distribution: Higher frequency means more pulses emitted per unit time, but each pulse has relatively lower energy. High frequency (e.g., ≥300 kHz) achieves delicate effects like background shading on stainless steel.
Larger pulse width increases thermal impact: Larger pulse widths (e.g., 100 ns or 200 ns) suit metal marking; smaller widths (e.g., 2 ns or 10 ns) suit high-precision surface processing.
High frequency + high speed: High frequency typically requires higher speeds to maintain processing efficiency and avoid overheating.
Generally recommended for stainless steel color laser engraving: high frequency, small pulse width, low power. This enables rich color variations and fine textures.
Pulse width: 3–10 ns
Frequency: 200–2000 kHz
Engrave only once (repeated marking overwrites colors).
Set line spacing to 0.001–0.005 mm (typically 0.001 mm or 0.002 mm).
Select solid fill for solid marking effects.
After setting parameters:
Place the stainless steel plate horizontally on the cutting panel.
Manually focus. Set the engraving position near the plate edge.
Click "Start Engraving". After completion, observe the color. If the result is blue, name the parameter set as "Blue" to prevent data loss and re-engraving.
3.3 Material Test (if sufficient material)
Use LightBurn’s "Material Test" tool:
The initial interface is as shown. Set variable parameters for the X-axis and Y-axis, plus engraving area size. Frequency and pulse width are the two primary factors affecting color laser engraving, so assign them to the X-axis and Y-axis.
The maximum/minimum values for frequency and pulse width depend on your desired test range. To test maximum color variations:
Frequency:200–2000 kHz
Pulse width: 3–10 ns
Ensure integer values for each axis segment to simplify parameter setting.
Fixed parameters power and speed must be set:
Higher frequency requires lower power.
Larger pulse width requires higher power.
Recommended power: 20–40%. (Excessive power darkens engravings and inhibits color development)
Recommended speed: 1000–2000 mm/s.
Finally, click "Enable Text" to engrave corresponding parameters for observation.
Notes:
Do not move the metal plate during testing (takes time).
Large test areas may cause thermal deformation → Use a fan for physical cooling.
Power: 20%, Speed: 2000 mm/s, Line spacing: 0.002 mm.
3.4 Vector Graphic Engraving
After completing parameter settings:
Separate image layers by color.
Assign parameters to each layer based on material test results.
Click "Layer Optimization Settings" → Select "Order By Layer".
Verify settings → Begin engraving.
For color laser engraving, metal (e.g., stainless steel) is recommended to avoid complications like toxic gas emission (plastics) or charring (wood).
IV. Conclusion
Color laser engraving will bring new surprises and challenges to your laser engraving journey. It can unlock new dimensions for your creations, but also introduces additional considerations during the engraving process. Attention must be paid to:
Material characteristics
Parameter adjustments
Recording color values
Ultimately, learning color laser engraving is a rewarding process. We recommend using the EM-Smart MOPA – while color laser engraving is its defining feature, it also delivers exceptional performance in daily applications like precision engraving, deep engraving, and cutting.