Creative Craft Ideas: How to Make Laser Cut Wood Earrings
Par MullerYvonne
Looking for creative craft ideas for laser cut wood earrings? Whether you're a jewelry maker or a DIY enthusiast, crafting wooden earrings with laser cutting offers endless possibilities. From intricate floral designs to bold geometric shapes, you can bring your ideas to life with precision and detail.
In this guide, we’ll explore unique craft concepts and helpful tips to create stunning, one-of-a-kind wooden earrings that are sure to make a statement. Let’s get started on crafting your next favorite accessory.
I. What Materials Are Suitable for Laser Cut Wooden Earrings?
Choosing the right material is crucial for creating beautiful and durable laser cut wooden earrings. Here’s a quick guide to some of the best woods for your projects:
Poplar Soft, easy to engrave, and affordable. Ideal for beginners and intricate designs.
Birch Smooth surface with fine grain, perfect for clean, detailed cuts and minimalistic designs.
Cherry Rich, reddish-brown color with excellent engraving quality. Great for elegant, high-end earrings.
Maple Durable and versatile, perfect for both detailed and simple designs with clean, sharp cuts.
Plywood Cost-effective and lightweight, ideal for more intricate shapes and larger projects.
Basswood Soft and lightweight with a fine texture, perfect for achieving delicate engravings.
II. Craft Ideas for Laser Cut Wooden Earrings
Laser cutting brings endless possibilities to create unique, stylish, and personalized wooden earrings. Here are some exciting ideas to inspire your next project:
1. Geometric Shapes for a Modern Twist
Geometric designs are all about clean lines and bold shapes, ideal for those who love modern, minimalist aesthetics. Imagine a pair of earrings featuring triangles stacked on top of one another, or a set of circular earrings with intricate latticework inside. These sleek, sharp designs add sophistication to any look, whether you’re dressing up for a night out or keeping it casual during the day.
2. Nature-Inspired Laser Cut Designs
Nature has always been a rich source of inspiration, and laser cutting is the perfect medium to bring natural elements to life in your jewelry. Designs like leaves, branches, or flower petals can be transformed into elegant, organic shapes. These earrings carry the essence of the outdoors, bringing a sense of tranquility and natural beauty to any outfit.
3. Personalized Engravings for a Meaningful Touch
Nothing says “one-of-a-kind” like adding a personalized message or design. Whether it's your initials, a meaningful date, or a favorite quote, engraved earrings make for memorable gifts or personal treasures. Personalized earrings are perfect for weddings, anniversaries, or as a thoughtful gift for a loved one, allowing you to carry a meaningful message close to you at all times.
4. Mandala Boho Chic Earrings
Mandala patterns are perfect for those who love intricate, bohemian-style jewelry. Laser-cut mandalas feature complex, symmetrical designs that symbolize balance, unity, and spirituality. These earrings are not only visually striking but also carry deep symbolic meanings, making them the perfect accessory for a laid-back yet meaningful look.
III. How to Choose the Best Equipment for Your Laser Cut Wooden Earrings?
When it comes to creating intricate and high-quality laser cut wooden earrings, choosing the right equipment is crucial to achieving precision and efficiency.
Key Features to Look for in a Laser Cutter:
1. Precision and Accuracy:
The laser cutter must provide high precision to produce detailed, sharp cuts that bring your earring designs to life.
2. Ease of Use:
A user-friendly interface and simple design software integration are essential, especially if you're new to laser cutting.
3. Material Versatility:
The machine should be able to cut and engrave a variety of materials used for earrings, such as thin wood, acrylic, and other lightweight materials.
4. Compact Size:
A smaller, portable machine will allow you to work in tight spaces or at home without taking up much room.
5. Affordable and Cost-Effective:
Especially for hobbyists or small businesses, the cost of the machine should align with the budget, offering a good return on investment for the quality of work produced.
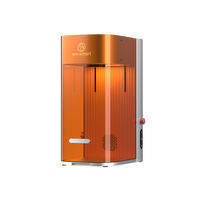
Why Choose the EM-Smart Dual Desktop Laser Engraver?
The EM-Smart Dual Desktop Laser Engraver is the ideal tool for crafting precise laser-cut wooden earrings. Here’s why it’s perfect for your projects:
Dual Laser System:With both a 20W Fiber and 20W Diode Laser, it handles a wide range of materials, ensuring clean cuts and detailed engravings, whether you're working with softwoods or harder woods.
Precision and Accuracy:Offering an accuracy of ±0.002 mm, it provides intricate detailing for beautiful, high-quality earring designs.
User-Friendly:LightBurn software comes pre-installed, allowing easy design creation and seamless machine integration, making it suitable for both beginners and experts. (Clicke here to learn more!)
Compact and Space-Saving:Its compact design fits perfectly in home studios or small workspaces without compromising on performance.
Fast and Efficient:The EM-Smart Dual ensures quick production without sacrificing quality, making it ideal for both individual projects and batch production.
IV. How to Make Wooden Earrings with Dual Desktop Laser Engraver
Now it’s time to dive into the actual craft process. This step-by-step guide will walk you through every stage of making your own custom wooden earrings, from design to engraving, using the powerful Dual desktop laser engraver. Let’s get started!
Step 1: Designing Stunning Wooden Earrings
Designing the earrings starts with sketching simple shapes. If you’re new to laser engraving, begin with basic designs like hearts, circles, or teardrops. Once the base shape is ready, you can add intricate details such as patterns, geometric lines, or personalized text. It’s essential to ensure all lines are solid to prevent incomplete cuts. Take a flower-shaped earring as an example: you might design the outline of the flower first, then add detailed elements such as whether it should be hollowed out or if additional engraving details should be added.
Step 2: Importing File and Set Focus
After creating the design, import the vector file into LightBurn. Place the wood sheet onto the engraving panel, then use the electric lift to adjust the height for accurate focusing. When the two focus points align perfectly, the focus is set. Proper focusing enhances laser density, leading to faster and cleaner cuts. The EM-Smart Dual desktop laser engraver is equipped with an invisible pulley drive system, which ensures smooth and efficient electric lift movement, combining elegance and functionality.
Step 3: Adjusting Laser Setting for Best Results
Laser engraving and cutting may require different parameter settings, and these can be finished at the same by using the sub-layer. For example, when engraving and cutting on a 1.5 mm thick linden wood board, you can set the power to 80% and speed to 50 mm/s for cutting, with the number of engraving passes adjusted based on the material and design. For engraving, you can set the engraving speed to 60, the speed to 500 mm/s, the fill to 0.05 mm, and the frequency to 20 kHz. Of course, these settings are provided for reference only.
Step 4: Material Testing
Before engraving, test the material to ensure it’s compatible with the laser settings. Check the burn depth and cleanliness of the cuts to avoid issues like charring. Use LightBurn's material testing feature to adjust power and speed settings efficiently. This quick test helps minimize waste, saving time and material, ensuring the best engraving results.
Step 5: Bring Your Design to Life - Start Engraving!
Once everything is set, start engraving. During the process, you may notice small flames on the wood, which is a normal occurrence. If this happens, adjusting the speed or reducing the power can help control it.
Step 6: Finishing Touches - Polish and Assemble Your Earrings
After engraving, smooth the surface using sandpaper for a polished finish. To enhance durability and color vibrancy, sealing the earrings with beeswax or linseed oil is recommended. Finally, attach ear hooks or studs, and your custom wooden earrings are ready.
EM-Smart has been committed to designing and manufacturing portable laser marking machines as well as developing innovative laser solutions for a wide range of industries. We wish you success in creating unique wooden earrings, and may you enjoy a wonderful celebration with family and friends!